SERVICE MANUAL
  Applies to: Hyundai Coupe/Tiburon 1998-2001
GROUP
Engine Mechanical System Cooling System
Return to Main Menu(s):      Mechanical Manual      Electrical Manual

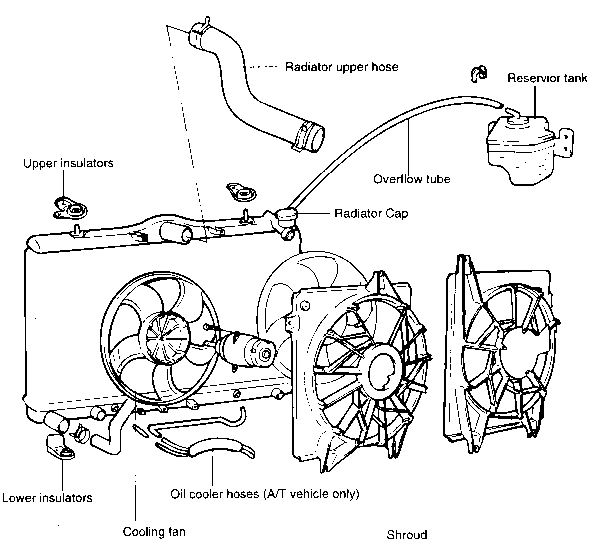
COMPONENTS 

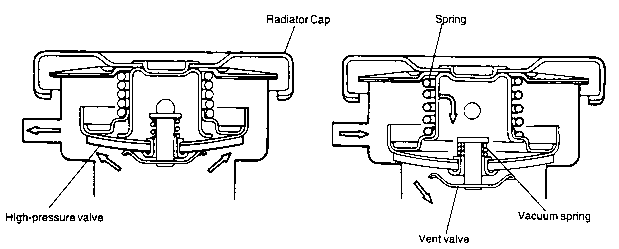
Figure Left: When the pressure rises to the specified level [81.4-108 KPa (0.83-1.1 kg/cm, 11.8-15.6 psi)]

Figure Right: When the pressure is reduced to the specified level [-6.86 KPa (-0.07 kg/cm, -1.00 psi)]

Return to Main Menu(s):      Mechanical Manual      Electrical Manual

RADIATOR CAP PRESSURE TEST 
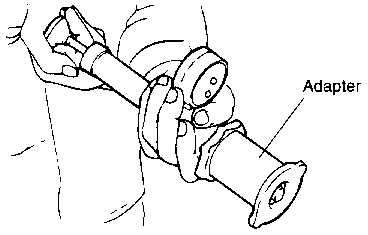
  1. Use an adapter to attach the cap to the tester.

  1. Increase the pressure until the gauge stops moving.

PRESSURE SPECIFICATION
Main valve opening pressure 0.83-1.1 kg·cm ( 81.4-108 kPa, 11.8-15.6 psi )
PRESSURE SPECIFICATION
Limit 0.65 kg·cm ( 65 kPa, 9.2 psi )
  1. Check that the pressure level is maintained at or below the limit.

  1. Replace the radiator cap if the reading does not remain at or below the limit.

    NOTE
    Be sure that the cap is clean before testing, since rust or other foreign material on the cap seal will cause an incorrect indication.
Return to Main Menu(s):      Mechanical Manual      Electrical Manual

REASSEMBLY 
  1. Fill the radiator and reservoir tank with clean coolant mixture.

  1. Run the engine until the thermostat opens, and then stop the engine.

  1. Remove the radiator cap, and add coolant up to the filler neck of the radiator, and then fill the reservoir tank to the upper level.

  1. Check that there is no leakage from the radiator, hoses or connections.

Return to Main Menu(s):      Mechanical Manual      Electrical Manual

INSPECTION  
  1. Check the radiator for bent, broken or plugged fins.

  1. Check the radiator for corrosion, damage, rust or scale.

  1. Check the radiator hoses for cracks, damage or deterioration.

  1. Check the reservoir tank for damage.

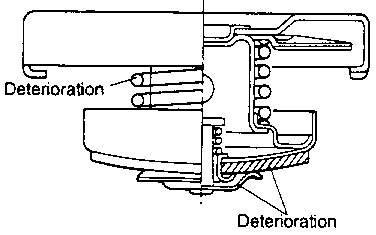
  1. Check the radiator cap spring for damage.

  1. Test the pressure of the cap using a cooling system checker

  1. Check the radiator cap seal for cracks or damage.

Radiator Fan Motor
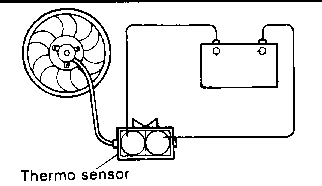
  1. Check that the radiator fan rotates when battery voltage is applied to the terminals (as shown in figure).

  1. Check that abnormal noises are not produced while the motor is turning.

A/C SWITCH
RADIATOR FAN MOTOR
REMARK
OFF
OFF
|
ON
1 .Coolant temperature is higher than 95°C (205°F)2. CTS fails
ON
ON
IG.KEY is turned on
Return to Main Menu(s):      Mechanical Manual      Electrical Manual

INSPECTION 
RADIATOR CAP
  1. Check the radiator cap for damage, cracks and deterioration.

  1. Attach a radiator cap tester to the radiator.

  1. Pump the tester until the pointer stabilizes.

  1. If the pointer stays constant for 10 sec. at a point exceeding the service limit, the radiator cap is good.

Return to Main Menu(s):      Mechanical Manual      Electrical Manual

COMPONENTS 
Return to Main Menu(s):      Mechanical Manual      Electrical Manual

DISASSEMBLY 
  1. Disconnect the radiator fan motor connector.

  1. Set the temperature of the heater control to the hot position.

  1. Loosen the radiator drain plug to drain coolant.

  1. Disconnect the upper and lower hose and overflow tube.

  1. For vehicles with automatic transaxles, disconnect the oil cooler hoses from the automatic transaxle.

CAUTION
Plug the ends of the oil cooler hoses and the automatic transaxle fittings to prevent transaxle fluid from spilling out and foreign material from entering.
  1. Remove the radiator mounting bolts.

  1. Remove the radiator together with the fan motor.

  1. Remove the fan motor from the radiator.