Page
last edited Tuesday, 13-May-2008 12:03:35 BST
HowTo: Electric Aerial Overhaul
(You can see my other 'HowTo' guides here)
Having
suffered the embarrassment of several weeks with my electric aerial
sounding like it was going to explode, not to mention it failing to
fully retract, I decided it about time I took the thing apart for an
overhaul. It seems quite a common occurrence that people have similar problems with their aeriels, and chances are the
majority of faults all boil down to the same underlying cause - poor
lubrication with age (matron)... So, I took some photos along the way
in case anyone feels like giving their's the once over.
Firstly, it is important to have a basic understanding of how these
things operate as it'll make the job so much easier if you know what's
what and why. The aerial is basically a traditional telecopic aerial
with a flexible splined/toothed runner running through the middle and
secured at the tip. This runner is wrapped around a toothed drum which
in turn is powered through a small gearbox and worm gear connected to a
motor. The motor is controlled by a small circuit which serves to
detect when the aerial is fully extended/retracted by monitoring the
current draw of the motor - this will increase under the increased load
when the aerial reaches its extremities.
However, and this is where the problems are likely to sit, over time
the aerial will lose its lubrication over time through wear (age) and
water/dirt entering the mechanism. The latter is caused by water
running down the aerial when in use as well as when it is retracted
inside and whilst there is a drip pipe to let excess water out of the
bottom the dirt will remain. This eventually results in the aerial
being so hard to move that the control board thinks the aerial is
extended/retracted when its not and hence cuts the power. If we clean
the aerial out before it gets too worn by this dirt we can re-lubricate
it and should get it working as good as new.
So, with the theory out of the way let's crack on! To start, unscrew the outer shroud with a pair of long nose pliers:
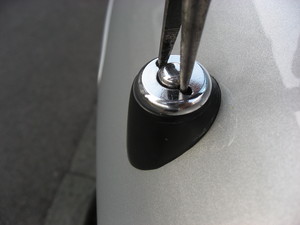
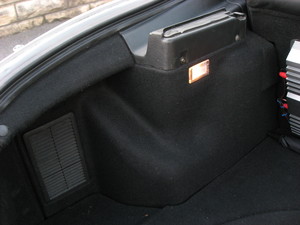
Next remove enough of the interior boot lining to access the aerial and remove the two mounting bolts:
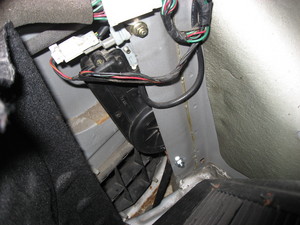
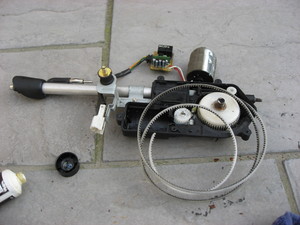
Having unplugged the aerial (two plugs - power and the aerial RF feed)
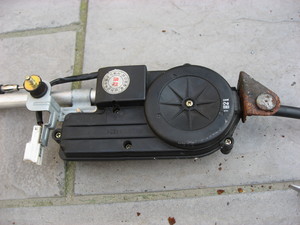
and removed it from the car you are ready to remove the casing. To do
so require the removal of the 7(?) screws, the lower mounting plate
nut/washer and drain pipe, and prising the casing apart (it's slightly
glued):
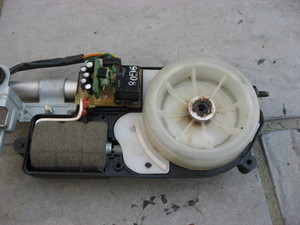
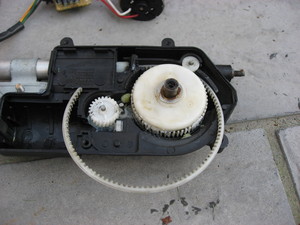
Remove the metal retaining washer above the runner drum and pull/waggle
the drum case off - the runner will explode out and you'll think 'd'oh
- that's torn it...' but this is to be expected so don't worry! ;) Then
remove the white cover/guide plate and motor. Take the worm gear out
also as this will enable us to the extend/retract the aerial by hand:
Clean and re-grease the runner and all other exposed parts and then
manually extend the aerial to get most of the runner out of the way
(this is critical as you'll never get the thing back together leaving
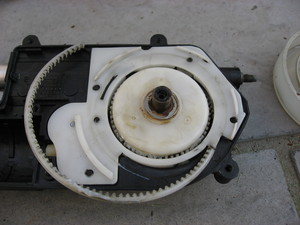
the runner as a big springy coil!). Then you can also remove the main
toothed drum for cleaning if desired. The toothed drum must be fitted
back correctly by locating the internal protrusion into the space in
between the ends of the looped spring (this sounds complicated but
you'll know what I mean when you see it):
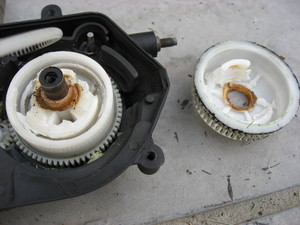
The internal spring mechanism serves two purposes - it helps overcome
any intermittent stickiness of the aerial by storing/releasing kinetic
energy by giving it a bit of a 'kick' whilst moving, and also keeps the
aerial in the fully extended/retracted positions when the motor stops.
Having cleaned and re-greased everything in sight you are know ready to
put the exposed end of the runner onto the drum ensuring the guide
roller (top-right) is in position keeping the runner firmly interlocked
with the toothed drum, then replace the motor and worm gear and put the
cover plate back on (ignore that I've left the motor out in the photos,
you should put yours back in):
Now coil up the excess runner inside the drum cover and fit the latter
onto the shaft. This sounds tricky but it's not! Don't forget to put
the metal washer back on the shaft and then you're good to go with
putting the case back on.
You will have to leave the aerial extended at the moment as the worm
gear will stop the gears moving hence you cannot just push the aerial
down by hand. When you're ready to refit to the car connect the power
plug and it should retract (unless you've left the radio on!).
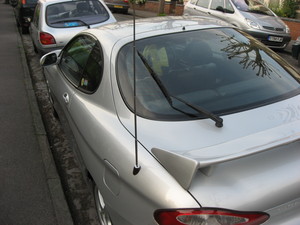
Once back in the car (don't forgot to put the drain pipe through the
grommet in the floor of the car, and connect both plugs up - power and
aerial RF), stick the stereo on and finger's crossed you'll have a nice
quiet fully-operational aerial once more!
2,966,088
Visitors
(since Apr 2003)

© 2002-2026 Mathew Newton
Unless otherwise stated, all content on this site is licensed under a Creative Commons Attribution-Non-Commercial-ShareAlike 3.0 Unported License
Any reproduction/reuse of content must comply with this license and be attributed to Mathew Newton
If you're human, don't click here, here or here